Theresa's Mixed Nuts: activities
Showing posts with label activities. Show all posts

Sunday, December 9, 2012

Holidays Downtown!

I love to go downtown this time of year! If your city is anything like mine, then you know how very festive it is as Christmastime. Ours has something special planned every weekend leading up to Christmas, so our weekends are pretty full in December.

Friday night we went out to get photos with Santa. Unfortunately, the line was way too long, but we did find The Grinch.

Stole Christmas, costume, holidayStole Christmas, holiday, costume

We hopped a ride on Santa's Trolly.


Admired some gingerbread houses that were on display for contest voting.

decorating, contest, christmas, church, ginger breaddecorating, contest, christmas, ginger bread


Decorated and ate some Christmas cookies.


And since we missed Santa on Friday night, we decided to wake up early and have breakfast with him on Saturday morning. This Santa is by far the BEST Santa I have ever come across. This is our 4th year doing breakfast with him. If you tell him what you want, he always knows exactly what you are talking about. My girls said American Girl stuff. He then proceeded to tell me the best route to the American Girl store in Chicago and talked about eating lunch with the dolls there. Then he easily had the same conversation about wrestling figures with the next kid. If there ever was a modern day Santa, I've found him.


Does your town do anything special for the holidays? If so, what have you done so far this year?

Friday, October 12, 2012

Halloween Party Games Part 2

*Disclosure. This post contains affiliate links. Please see my policy tab for more information.


Halloween Party Games


This is part 2 of my list of Halloween Party Games that we like to play at our party each year. If you would like to read post 1, you can find it HERE.


All of the games have been modified so everyone can play together without the bigger kids hurting or leaving the smaller kids out. Most games require a time limit, so we download Halloween songs and play those. When the music stops, the round or game is over.

Acorn Bucket Fill
Divide players into 2 teams. Place a lot of acorns in a bowl. Using a spoon or other object that makes holding acorns difficult, like these Halloween Skeleton Hand & Arm Tongs, have each player get a spoonful, then race to a bucket to dump their acorns into. If any fall off the spoon, they are not allowed to pick them up. When the music stops, the team with the most in their bucket are the winners.

Halloween Game


Cotton Ball Scoop
This is the same idea as the acorn bucket fill game, only using cotton balls. Make sure your cotton balls are separated or some will get an unfair advantage.

Halloween Game

Halloween Game

Halloween Game


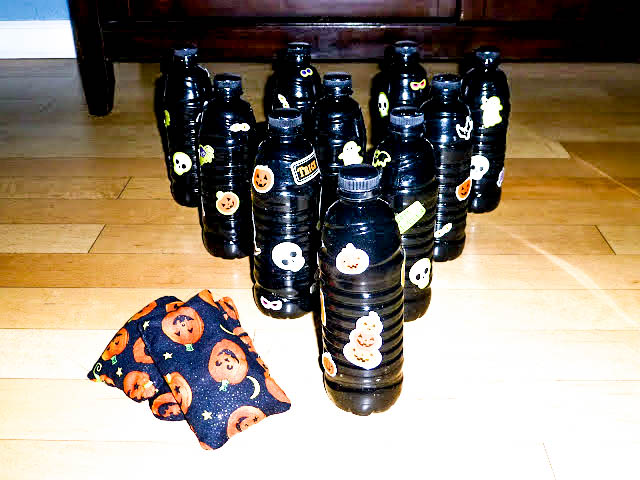
Water Bottle Bean Bag Toss
With this game I just spray painted some water bottles black. I put a little rice in the bottom of each to keep them from tumbling over on their own. I made some bean bags out of Halloween fabric. Children throw the bean bags at the bottles. Whoever knocks the most over wins.

Halloween Games

Candy Corn Drop
Have children stand on a step stool. Place a 2 liter bottle in front of them. Give them candy corns. Children must try to drop the candy corns through the opening of the bottle. Whoever has the most when the music stops is the winner *this could get frustrating for younger players, so cutting their opening a bit bigger is ok*

Pumpkin Pop 

Pumpkin Balloons (store bought or orange where you can draw on your own pumpkin face) are tied to each kid's ankle with a string. They have to try to pop each others balloon by stomping on it. The last player with an inflated balloon still tied to their ankle wins.


Pumpkin Roll  
Divide kids into 2 teams. Each team gets a pumpkin, roughly the size of a head- evenly round so it rolls well. Set a cone a few yards away. Have the children take turns rolling the pumpkin from the start line, around the cone, then back to the start line. The team that has the last member across the line wins.

Halloween Game

Pumpkin Relay Race 
Divide kids into 2 teams. Position them an even amount of feet apart and around an object, like a house or just around the outskirts of the yard. Give the person in position 1 a mini pumpkin. Have them race to person in position 2 to pass the pumpkin off to them, and so on, until the last child has the pumpkin and passes the finish line. The team with the first child across wins.

Good Old Fashion PiƱata
I don’t put candy in our goodies bags since I figure the kids are getting enough sweets over the next few weeks. However, I don’t think any party is complete without a Halloween Pinata!

Kids, children, all ages, pinata, pumpkin

Halloween Bingo
This one is pretty self explanatory :)  A quick Google search will get you a ton of free printable Bingo cards, or if you are feeling creative, make some up yourself!


Skeleton Dice Roll
I found these plastic skeletons at the dollar store. They are not assembled. Using dice, players must try to roll the skeleton back together. Roll 1 get a head, roll 2 get a hand, ect. The team that completes their skeleton first wins.

Halloween Game


Wood Craft Surface Coloring

We found some wooden face masks and door hangers at Michael's for $1 each. When it was time to start winding down a bit, we broke them out with a few paint pens and Sharpie markers. It keeps the kids busy while setting up new games or to give the parents a little quiet time ;)


Cookie Decorating

Make some cut out sugar cookies in Halloween shapes. Then let the kids chose 2 or 3 each they would like to decorate. Then break out the frosting, sprinkles, gel decorators icing, candy corns, and anything else you can think of that kids would love to put on their cookies. Kids LOVE to get creative, and this is one activity they can make one of a kind, then enjoy the sweet reward at the end!


activities, holiday, kids, children, all ages, cookie decorating, spooky

Pumpkin Decorating
I conclude every Halloween Party with pumpkin decorating. This has been the highlight of the party every year. The kids love to get creative and deck their pumpkins out. Here are some items we use that help them dress up their pumpkins:

Paint Pens *I recommend these over traditional paints. Paint Pens dry very quickly, so the kids aren’t leaving with wet paint pumpkins that will get all over the kids, the cars or ruin on the way home.*
Black Yarn
Pom Poms
Googly Eyes
Glitter *be warned, kids LOVE glitter! Your floors will shine for days if you choose to break out the glitter!*
Tacky Glue *Have enough on hand for each child. Michael’s sells the small 3 packs for around $2.50 each*
Witches Hats *You can find my tutorial for these HERE*
Candy- like m&m’s, twizzlers, gummy savers, ect.
Foam cutouts. Again, Michael’s sells big packs of small size foam cutouts your kids will love to plaster on their pumpkins!


Monday, February 6, 2012

Roller Skating!

This winter weather has been crazy! It is making it difficult for us to find things to do on the weekends. Normally we would be planning out sledding and tubing filled weekends, building snowmen or having snowball fights, but since it seems to snow during the week, then it all melts by Friday, we have had to find new activities to fill our weekends. My husband was flipping through the paper and saw that the local skating rink offered roller skating lessons on Saturday mornings. The only skates my kids have ever put on were those chunky Fisher Price plastic skates that you put on over your shoes, so we figured it would be fun to have them go to a real roller skating center and try it out.

A slightly heated debate started over who should get out on the floor with the kids. My husband thinks that if he falls and breaks a leg he can not go to work. I guess you need a fully functioning leg to sit at a desk all day. Apparently I don’t need my limbs because I’m a stay at home mom, so mine aren’t as important. In the end, we both agreed we would both suffer with broken body parts and each of us popped on a pair of skates. It turns out neither of us needed to. The instructors ended up kicking me out of Allison’s area and Mariah pretty much had herself a one on one instructor the whole time.

Allison took to it like a pro. Only a few tumbles, but otherwise, she was whizzing around like she’d been doing it for years.


Mariah on the other hand... Let’s just say that by the time we left I was ready to march into her old gymnastics center and demand my money back for 4 years of classes, because they surely didn’t teach her balance. Poor kid had the roughest time, and ended up in tears twice. I don’t think she’ll want to repeat her roller skating adventure any time soon.


I am really glad we went. I was nervous about skating myself, but it’s like riding a bike. Once you learn, you don’t ever forget how to do it.


And how about that Super Bowl? I’ll admit, I didn’t really watch the game, but the half time was pretty good! A couple of the commercials were pretty funny and we had enough food to feed an army! We’ll be eating left overs for a few days. Overall, a perfect ending to a great weekend!


Monday, January 23, 2012

Colored Sand

We were at Hobby Lobby the other day, and my girls wanted some of those plastic sand containers. You know the ones that are shaped like hearts and bears that you fill with different colored sand. Those were pretty inexpensive, but when I saw how much the sand was to fill them with, I about choked. I was certain we could probably dye our own, so I set off to Lowe's and grabbed a 50lb bag of play sand for $3, came home, and tried my hand at coloring my own.


colored sand


What you need:

Play sand. I like the bags Lowe's carries. It is very soft and fine. Home Depot's seem very rough and gritty.
Food Coloring
Water
bowls


Directions:

Fill bowl with desired amount of sand.
Fill bowl with just enough water to cover the sand. Apply several drops of food coloring in the shade of your choosing. Apply more drops if you wish for a darker color.
Let sand sit for several hours. You can also stir the sand every once in a while to ensure the coloring is being evenly distributed.
Dump the sand onto a flat surface (I used an old cookie sheet) to dry. This could take a while, so if you are in a hurry, you can dry out sand in the oven. Heat oven to 250 degrees and put sand in with the oven door opened until it is dry.

All of this was made for a LOT less than you can purchase the colored sand for in the stores. The 50lb bag was only $3 and that will get you a lot of sand to color and play with!